Wednesday, July 10, 2013

One Way To Make a Coupon Organizer

I've used the same coupon organizer that I bought on line for several years.  It has now officially been declared "worn out".  But, I loved using that pocket style coupon organizer.  I was just about to order myself another one, but it didn't make sense to me to spend money if I could make something similar myself.

There were several of these small size 3 ring notebooks at my office that had previously contained insurance information and were going to be thrown away.  Its hard for me to throw away something that could be used, so I stuck 3 of them in one of my filing cabinet drawers.  They are 7 1/2 by 9 inches.  The spine is 1 1/2 inches wide.

I like that this notebook isn't full size and so it will fit in my purse.  I don't think I would like using a full size notebook in the store.  Too big and cumbersome!  This one is big enough, but I don't feel like people are thinking I'm a "crazy coupon lady".  I can decorate it by putting pictures or cards inside the plastic sleeve on the outside and along the spine.


I made some cardboard pockets similar to the ones in my old coupon organizer.  I loved being able to label them any way I wanted to.  On my old one, I had marked out and renamed some of the categories.  It has pockets in the front and the back that work great for holding my grocery lists, coupons to be used or receipts.


Here's how I made the pockets.  I had a package of plain file folders at home that I used for most of the pockets, but you could use any light weight cardboard.  Some of my pockets are smaller than others.

Open the file folder or other cardboard and then fold the bottom half up to the size you want your pockets to be.

 
Then fold it back in half. Cut the edge off so that its the size you want. Then just tape the side together, punch holes and insert in the notebook.
 

If you don't have a notebook, I am sure there are other ways to secure the pockets together.

However, the point is to have a nice organizer without spending any or much money.  Look around to see what you already have on hand.  I think you could make a pretty cardboard cover and use ribbon in the punched holes to hold it together.  If you put on your creative thinking cap, I'm sure you could make one even better than mine!

Tuesday, July 9, 2013

Romantic White Flowers in a Country Colander

I got the idea to put some white flowers in Mama's old aluminum colander from THIS POST at Kate's Place.   There is so much inspiration on Kate's blog, I could sit and read it for hours.

Although my arrangement doesn't look nearly as good as that one, I do kind of like it.  It has the contrasting themes of romantic white roses and a country "dinged" up colander. 


Beside it is a battery operated heart shaped candle that flickers just like a real candle, without the worries of open flames.  And you guessed it, also Mama's.


I haven't taken the time to figure out another style runner, so for now its Americana meets romance!


I didn't even take the tags of the flowers bought at Dollar General or use florist's foam!  Just bent the stems in a "u" shape and stuck them in.


Maybe I'll have time to do a better job of decorating soon, but for now, this is what's on the kitchen table at the farmhouse.

Today, I'm linking to NIFTY THRIFTY TUESDAY at Coastal Charm!  Look at all the wonderful decorating ideas over there!!!!

Monday, July 8, 2013

Mama's Vintage Bread Box

We are still cleaning out Mama's house and what an adventure it has been! Lots of hard work, sprinkled with a few tears, memories and rewards.  I feel like this labor of love is something we are doing for our Mama.  She's right there with us.

Saturday, one brother was cleaning out an old wooden cabinet located under the carport and ran across another treasure. I don't remember this bread box at all and I am estimating that it is from the late 1940s to 1950s. The lid was pretty beat up and rusty, but the rest of it was in good condition. 

Beside it in this picture is a vintage metal sand bucket, found in the attic.
 
Before picture of vintage breadbox.

And what else would a mother store in an old bread box?  Of course!  Sewing patterns!


Yes, I did wear clothes like these and in fact remember wearing two of these outfits to school in the 5th grade.


I think the flowers on the front are beautiful.


Yesterday afternoon, after emptying the box, I decided to work on the lid.  I sanded it and wiped off the rust dust with a soft cloth.  Then I taped newspaper sheets on the floral sections to protect them from paint.  I already had a can of red spray paint.  It looks much better, but still retains that chippy, rusty, vintage look.

After the lid was painted.

I am planning to incorporate it into our farmhouse décor, along with some other vintage items that belonged to Mama.  I've been studying blogs and Pinterest for ideas.  Some other things of Mama's that will work with it are her flour sifter, rolling pins, small wooden bowl, wooden handled kitchen utensils, her biscuit cutter, iron frying pans and some vintage bowls. A future post!

I'm linking to NIFTY THRIFTY TUESDAY at Coastal Charm.

Friday, July 5, 2013

Summer Beauties!

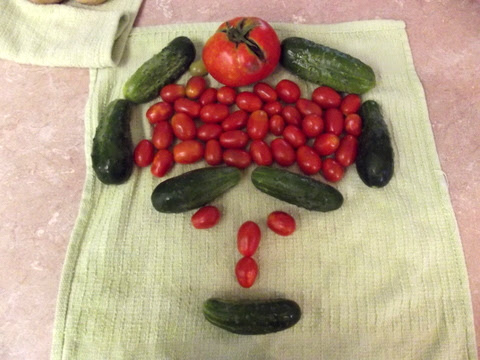
I was getting creative with these beautiful grape tomatoes and cucumbers yesterday morning. Love to go out to our small raised bed garden and gather the bounty.

Isn't she beautiful?

I have been experimenting with ways to use the grape tomatoes. They are great in pasta salads, green salads, or for just snacking on alone.  These are roasted with garlic and olive oil, in the oven.  Yummy!


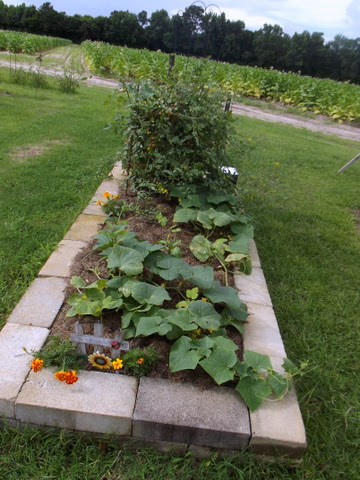
The green beans are finished, so I cut off the plants at soil level and put them on the lasagna bed.  I read that leaving the roots in the ground added nitrogen to it.  Now the cucumbers have more room to roam, and you can't see them in the picture, but there are a few okra plants.  I mulched around all the plants with grass clippings.

I have thoroughly enjoyed the raised bed this year and hope to add another one next year.


Here is the grape tomato vine.  I pick them as soon as they start to turn red and then they finish ripening on the kitchen counter.  This is the first time I've had a grape tomato vine and I will definitely be growing them again in the future.


Here are a couple of cucumbers, hanging on the trellis.


I made some refrigerator pickles for the first time, since I really didn't have enough cucumbers to can a batch of the southern sweet pickles that I have made in the past.  I might have enough cucumbers soon to do so though!


We enjoyed delicious corn on the cob that was gifted to us, for the Fourth of July.


There were enough ears to freeze some.  After blanching them, we wrapped the ears individually with freezer paper and then put them in gallon size freezer bags.  I plan to use them in a timely manner, because frozen corn on the cob loses its flavor after a few months.


A basket of goodies!

A huge locally grown cantaloupe:

As is the case every year, some of our crops thrive and others don't.  The little squash I planted in the front flower bed have done absolutely nothing!  Normally squash will grow anywhere, but not this time.

Enjoy your July weekend!  I made my own coupon organizer and can't wait to try it out today and show it to you next week!

Thursday, July 4, 2013

A couple of Fourth of July Deals....

Happy Fourth of July to everyone!

Here are a couple of deals I thought I'd share.

1.  Avon online has free shipping on any size order. BE SURE to put the code JULYFS in the space for coupon codes.  I almost didn't change the code to the free ship code before finishing the order, which would have been very sad.

  Lip balms are on sale for 69 cents, so I ordered a few for Christmas stocking stuffers.  I hate to pay shipping when I can get a similar item at a store, so I enjoyed looking over the site for sale items.  I ended up spending less than 10 dollars and paid for that with my Pine Cone Research survey money that was in my Paypal Account.

I bought 9 of the flavored lip glosses and 3 of the Kids' bath body paint.  These will go into my gift box to be saved until Christmas.  Although, if my grandson spends the night with us between then and now, I may cave and give him the bath paint to use while he is here.... 

2.  Food Lion Coupons.  If you are on Food Lion's email list they will send you coupons every week.  The great thing about it is that they are often good for things like meat and produce.  I love those kinds of coupons.   But, you don't have to subscribe to the email to get the coupons. 

 HERE is a link to this week's coupons. 

My favorites this week are:

50 cents off any condiment.  I looked up the definition of condiment, and this could include many items that would end up being free after using a 50 cent coupon.  Isn't salt a condiment?  Anyway, even if you used it on mustard or ketchup, it would be a good deal.  I may use it toward mayonnaise.

$2.00 off $5.00 purchase of meat.  This is an awesome coupon!  Use it toward meat that is on sale or marked down and it really makes a good deal.

Just think, after today, all the back to school sales and summer clearance sales will start!  Fall is on the horizon....

Tuesday, July 2, 2013

Diggin Taters!

My grocery store seed potatoes, that I posted about HERE, actually produced some potatoes. The green part of the plant had turned yellow and so it was time to dig them. Hearing the "thud" of a potato being dropped into the bucket is a nice sound. Here are the potatoes with the dirt still clinging to them.


Maybe... 5 pounds.  It was a short little row and I used potatoes that were too old to eat.   Just enough potatoes to get that "new" potato taste.  I am pleased with how they turned out.


Obviously, these aren't the red new potatoes that Mama always grew.  Next year I will grow more and maybe different kinds.

One simple meal made with some of the smallest potatoes was hobo's.  I made the meat similar to meatloaf, topped with some of the potatoes and a little onion.  After wrapping it up with foil, I poked 3 or 4 holes in the bottom of the foil with a knife and placed the packets on a rack in a roasting pan.  This way the grease drained out into the pan and the food wasn't sitting in it.  Turned out really good!


There are some potatoes growing in the lasagna garden. It'll be interesting to see if they produce anything.

Monday, July 1, 2013

My Frugal Plans For the Week:

1.  Frugal Meals:

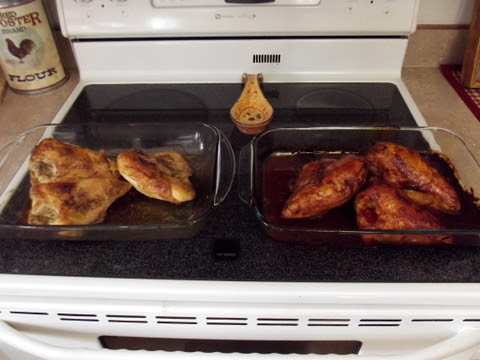
I purchased 2 packs of chicken breasts that were 99 cents per pound at Food Lion, which ended up being six large pieces.  On Sunday afternoon I put them all into the oven.  Three in one pan were barbecued and the other three in another pan were roasted.   I used 1/2 bottle of Kraft BBQ sauce bought on sale for 99 cents, with a 50 cent coupon, so this added about 25 cents to the cost.

The pieces are so large that I cut each one in half and, after its all said and done, there will be twelve servings of chicken.  That's not bad for about $7.00.   Cooking all of it at one time saved electricity and time.  So I think this qualifies as a very frugal thing.


As one more frugal use of this chicken, I poured the broth and drippings from the roasted chicken pan in to a saucepan and added water.  I cooked some rice in this and made a delicious side dish for the chicken.   Last night's supper was roast chicken, rice and I opened a can of "Grillin Beans" bought on sale with coupon.

Very rich chicken broth, too good to pour down the drain!


I put enough of the BBQ chicken in the fridge for one more meal this week and froze the rest.  The date and kind of chicken was written down on my list of possible meals that lays on the counter.  It'll be wonderful to simply take out a couple pieces of chicken, and make a couple of simple side dishes on a busy night after work.

2.  CVS:

The best deals I see will cost me $1.70 out of pocket and earn $12.00 extrabucks for next week:

Dial Soap, 3 pk, $2.00 Buy 2, Use $1.00 coupon off two (earns $2.00 extrabucks)

Planters Peanuts 16 oz,  $3.00, Less $1.00 coupon (earns $1.00 extrabucks)

Renu Contact Lens Solution:  $7.99, Less $2.00 coupon, less $2.00 off Any Contact Lens Solution (printed at CVS machine) (earns $5.00 extrabucks)

Schick Hydro 5 Razor, $9.99, Less $10 off any Schick Hydro 5 Razor  (printed at CVS machine)  (earns $4.00 extrabucks)

2 bottles of Kraft BBQ sauce = $2.00, less $1.00 off two, makes them both $1.00

2 boxes of Nabisco crackers at 99 cents, less $1.00 off two, makes them both 98 cents.

1 2 ltr Diet Pepsi 99 cents, less 25 cents coupon (print out at CVS machine) makes it 74 cents.

Total = $11.70, Less $10.00 extra bucks left from last week= $1.70 out of pocket.

Get back $12.00 extrabucks for next week!!!

3.  Storing the stock pile:

From our CVS/FoodLion stock pile, we were able to give our son a care package over the weekend.  This consisted of a large bottle of laundry detergent, a full size toothpaste, a travel size toothpaste, floss, large bottle of body wash and 2 rolls of toilet paper.  I'm sure that if he bought these things at full price they would have cost at least $20.00.   I think our cost was around $4.00.

CVS stash stored among the pickles!
I have a little story about my CVS stockpile.  When we first moved to the farmhouse in 2010, I stored some of the shampoos and body washes that I bought, free standing on the shelf above the washer and dryer.  Right beside the dryer is the hot water heater.  Some of the bottles were knocked over and they fell behind the water heater.  I COULD NOT GET THEM OUT!  So a large bottle of Men's Nivea Body Wash and a large bottle of Head and Shoulders shampoo have been stuck back there for 3 years.  Friday afternoon I just couldn't stand it any more, and I decided to try to get them out, just one more time.  It was a very hard job, but I finally got them out!   I now make sure that anything that could fall behind the hot water heater is stored in a plastic bin so that they can't be knocked over!

Friday, June 28, 2013

First Grader and 5 weeks to go

We attended my grandson's kindergarten graduation yesterday.  What a sweet age this is!  Its amazing how much a group of children can learn and mature in one year. 

Two Grandsons!
Our newest grandson will be here in 5 weeks.... or less.  He seems to want to come early.

First grader getting hugs.


Thursday, June 27, 2013

Recycling a Potato Chip Bag into a Baby Toy

We've all seen how much babies love to get hold of a newspaper or other crinkly paper. Of course, we run over and take it away from them immediately!  There are several tutorials on line for how to make a crinkly tag toy for babies.  Here are pictures of how I made one for my grandson using a recycled potato chip bag.

I retrieved an empty bbq potato chip bag from the trash.


I cut it open and washed the inside with a soapy dishcloth,rinsed it well and dried it.


Then I layered two pieces of flannel, right sides together with the ribbon loops laid between and a piece of the potato chip bag cut the same size on top.  I sewed a 1/2 inch seam all around, leaving an opening for turning.  Then you clip the corners and VERY CAREFULLY turn the toy right side out.  This was a very delicate process and you have to take your time, because the paper wants to tear at the opening.


Once I got it turned right side out I stitched around the edge, double stitching each ribbon loop.  The bag is safely enclosed inside the toy and neither the bag or the loops can come off. 

You can make this any size you want.  I made mine from scraps and the size was determined by the size of the scraps.

It turned out really cute and baby Walt can safely make that crinkly paper sound all he wants!


Wednesday, June 26, 2013

Tobacco Stories

Having tobacco planted behind and beside our house this Summer has brought back many memories of my childhood and it occurred to me that many of the people in this world have no idea how tobacco is harvested and especially how it was done back in the day when I was young, in the 1960s and 1970s.  Of course my elders tell me about more primitive ways of harvesting tobacco that make the way we did it look modern!


There was a whole language associated with tobacco in the South during those days. When young people hear me use some of these terms, they do not understand.  Here are some that I remember.

1.  Barnin baccer:  The entire process of harvesting and putting the tobacco into the barns to be cured.

3.  Settin out baccer:  The process of pulling the plants from a bed and then sitting on a "setter" pulled behind a tractor.  You lay the plant in a little hopper thing as it turns by you and it puts the plant in the ground.  You have to be quick and ready for it every time it comes back up.

3.  Toppin and succering baccer:  The tobacco plants get flowers on top and little side shoots that have to be picked off.  You "top" the flowers and "succer" the side leaves. 


4.  Croppin baccer:  The process of picking the leaves off the stalks.  The leaves were cropped starting with the bottom leaves.  Each tobacco plant was cropped several times over the summer, going up the stalk until all the leaves were gone.

5.  Sand lugs:  The bottom leaves that start turning slightly yellow first and are cropped first.  They are full of sand because they are near the ground.  These aren't as valuable as the leaves higher up on the stalk.

6.  Tyin baccer:  The process of sitting on the harvester and tying handfuls of tobacco on a  tobacco stick.  There was an art to this and I became pretty good at it.  My tobacco leaves did not fall of the stick after I tied them on there.  On the other hand, it had to be put on there in such a way that it was easy to take off the sticks as well.


7.  The baccer harvester.  This was way more labor intensive than it sounds.  The harvester was a contraption that was pulled by a tractor, had a shelter over it and pulled a baccer trailer behind.  The tobacco was planted with 4 rows on each side of a "middle".  the workers sat on the harvester as it slowly crept down the rows.  There were 4 pairs of workers, usually 4 teenage or adult guys who sat down near the ground in a seat and as they cropped the leaves off the plant, they would hand the handfuls of leaves up to the tyers, who sat up above them and who were usually girls.

There was also a person driving the tractor.  I was doing this at 8 years old with no umbrella over me in the hot North Carolina Summer sun.  Sun screen did not exist.  I had to know what to do when they said "whoa!", "slow down", or "speed up".  I stopped when I got to the end of the row and let an adult turn the thing into the next row.

The work crew was rounded out by another guy, who took the sticks of tobacco when they were full and tied off and layed them on a trailer that was being pulled behind the tractor.  Another job that a young child would do is to walk behind the whole thing and pick up any dropped leaves.


On the harvester there was usually a water cooler which was filled with a big chunk of ice and water each morning.  It was very important to have this water for the workers so that they could keep hydrated during the hot weather. 

Humid and hot does not even begin to describe what it felt like down there in the middle of those rows where no air could get to you.

8.  Baccer gum:  This is a nasty thick black coating that would get all over your hands by the end of the day.  Most of us didn't wear gloves because it was too hot.  At the end of the day it was nearly impossible to get this gum off your hands.  The only thing that would take it off easily was bleach!  I am assuming that this is what a smoker's lungs look like from smoking!


9.  Handing up the sticks.:  At the end of the day all those sticks of baccer loaded on the trailers had to be put into the barns.  The barns were very tall and had what were called tier poles in the top to hang the sticks on.  On the dirt floor were gas burners that would be lit to cure the leaves.  An assembly line was set up that ran from the trailers parked outside the barn, all the way to the top of the barns.  The teenage guys were usually up in the top of the barns, since they were usually strong and agile and could stand the heat.  and I mean HEAT!  Not to mention snakes....

This is an old tobacco barn.  There are many of these old relics all over the countryside in rural areas of the South.  Most are falling down and are covered with vines.  Some have been fixed up into nice storage buildings or even apartment type homes.


10.  Taking out baccer:  After the leaves had cured out enough they had to be taken out of the barn.  The assembly line was then done in reverse order.  The barns had to be emptied regularly to make room for more green tobacco.  This was often done before day on the same day that more tobbacco was to be harvested.  This means that many days started at 4:00 A.M. so that the barns would be ready.  The cured sticks of leaves were piled on trailers and taken to another barn or old deserted house called pack houses. 

11.  Taking off baccer:  This usually took place on rainy days when harvesting could not take place or in the fall. The leaves had to be taken off the sticks, sorted and put into baccer sheets, which are made of burlap.  These big sheets full of tobacco were taken to a tobacco warehouse where they were auctioned off. 

Taking off baccer was a much more pleasant job than barnin baccer!

12.  Getting the baccer in order:  Sometimes the tobacco leaves would get too dry in the barns and would be brittle and crumbly.  I have seen my Daddy have us lay all the sticks of tobacco all over the yard over night so that the dew would moisten them some and get them into "order".    That was a sight to see.


This only scratches the surface of the whole Southern Tobacco Society.  These days there are machines that crop the tobacco and they are put into bulk barns.  Its way less labor intensive, as far as I can tell.  I left those days behind over 35 years ago and don't really know the details of how it is done anymore.

13.  Choppin baccer and standin up baccer:  Chopping the grass and weeds.  Standing it back up after a storm.  These jobs took several workers all taking a row at the time.


Tobacco Barn in Winter

Here are a couple of interesting memories from my baccer barnin days:

1.  My Daddy would catch snakes and chase some of the workers with them.  I. am. not. kidding.....  They were not poisonous, and he was just playing around.    He never did that to me.  I remember at least one teenage guy who never came back after one of those episodes.

2.  One of the tractors had to be cranked with a hand crank.  Daddy tried to crank it one day and didn't have the tractor out of gear.  It nearly ran over him and did in fact run into a barn and did some serious damage.


3.  Tobacco harvesting was so dependent upon the local children and teenagers, that the first day of school was often delayed by 2 or 3 weeks to allow the last of the tobacco to be harvested, without interfering with school.  I think this may be where my love of Fall comes from.  I was so glad that summer and tobacco harvesting was over each year.

Boo!

A lot of people had good memories of their baccer barnin days and had good times.  Most of mine were not good.  But, it was part of my life and I learned a lot from it.  It taught me how to work and how to persevere.   To this day I have a good work ethic and know how blessed I am to have an office job with A/C!

Glimpses of Home - first quarter of 2021

I made a list of my 2021 goals that I wrote down in the back of my planner.  Its time to review that to see how I am doing! But, here are a ...