This year is the earliest Easter any of us will ever see the rest of our lives!
And only the most elderly of our population have ever seen it this early (95 years old or above!). And none of us have ever, or will ever, see it a day earlier! Here are the facts:
1. The next time Easter will be this early (March 23) will be the year 2228 (220 years from now). The last time it was this early was 1913. So if you're 95 or older, you are the only ones that were around for that!.
2. The next time it will be a day earlier, March 22, will be in the year 2285 (277 years from now). The last time it was on March 22 was 1818. So, no one alive today has or will ever see it any earlier than this year!
How is the date for Easter arrived at each year?
Easter is always the 1st Sunday after the 1st full moon after the Spring Equinox (which is March 20). This dating of Easter is based on the lunar calendar that Hebrew people used to identify passover, which is why it moves around on our Roman calendar. Based on this, Easter can actually be one day earlier (March 22) but that is pretty rare.
This information was taken from my church bulletin today.

Sunday, March 9, 2008

Saturday, March 8, 2008
Pocketbook Tutorial Part Four
All of the other posts in this series are under "Pocketbook Tutorial" in the labels section of my side bar.
Its time to sew the pockets on the lining.
First we'll take the pocket that we cut on the fold which is the width of the lining and sew it on like this. First I made a top stitch at the top near the fold about 3/8inch wide. Then pin the pocket on the lining. This pocket is wide enough that the edge will eventually be sewn in with the seam of the lining. For now sew starting at the top on one side all the way down, across the bottom and up the other side in a "u" shape, using about a 1/4 inch seam. Then decide how wide you want your pockets. I usually make mine around 4 inches wide. You'll end up with 3 pockets about 6 inches deep and 4 inches wide. I also like to make one narrow one that will hold a pen. I'm always looking for a pen in my pocketbook! The finished pocket will look like this.

I like to make another pocket on the other side of the lining using a different fabric. This one will be made from the tractor fabric. The size is up to you. Sometimes I make it the size of a cell phone. Sometimes it depends on how much fabric I have left. This one is 13 inches by 8 inches. The way I make this pocket is to turn down 1/2 inch at the top of the pocket and press. Then turn this down right sides together and sew a 1/2 inche seam on each side. Then turn this right side out, pushing out the corners well. Press. Then you can stitch a seam across the bottom of the hem you just made. Sew the seam from the bottom side of the fabric. It'll look like this.

Then pin the pocket onto the other lining piece and stitch around it like you did the first one and make your seams for the pockets. If you make it small for a cell phone, of course you'd only sew around the outside edge.

Finally you can start sewing the panels together.
Pin the lining pieces right sides together on the bottom seam. Stitch a 1/2 inch seam leaving about a 5 inch opening for turning the bag later. Press the seam open. If you press the bottom seam open before sewing the side seams it makes it easier to sew the bottom ends later. Then pin the side seams together and sew a 1/2 inch seam on them as well.

After you've sewn the bottom and side seams you'll see how to make the bottom square. Simply press each end together, matching seams and pin like this.

Then sew a 1/2 inch seam straight across. You can turn it to see what it looks like if you want, but you will need to turn it back so that the right sides are on the inside when sewing the outer and inner panels together.
Then you will do the same thing for the outer panels, except you won't leave an opening for turning. Sew the bottom seam first and press the seam open.

Turn the sewn together panels right side up and stitch a line on each side of the seam 1/4 inch away from the seam. I just put the edge of the presser foot on top of the seam and that gives me an accurate 1/4 inch distance. This reinforces the bag and makes the bottom look nice.

Then sew the outside seams. Make sure the side seams match if you added ribbon or used two fabrics on the front. Sew the ends of the bottom just like you did for the lining.

Turn the bag right side out. Isn't that cute?

In the next post in this series we'll make the handles and loop for the closure, sew the outside and inside panels together and hopefully finish this bag!
Its time to sew the pockets on the lining.
First we'll take the pocket that we cut on the fold which is the width of the lining and sew it on like this. First I made a top stitch at the top near the fold about 3/8inch wide. Then pin the pocket on the lining. This pocket is wide enough that the edge will eventually be sewn in with the seam of the lining. For now sew starting at the top on one side all the way down, across the bottom and up the other side in a "u" shape, using about a 1/4 inch seam. Then decide how wide you want your pockets. I usually make mine around 4 inches wide. You'll end up with 3 pockets about 6 inches deep and 4 inches wide. I also like to make one narrow one that will hold a pen. I'm always looking for a pen in my pocketbook! The finished pocket will look like this.

I like to make another pocket on the other side of the lining using a different fabric. This one will be made from the tractor fabric. The size is up to you. Sometimes I make it the size of a cell phone. Sometimes it depends on how much fabric I have left. This one is 13 inches by 8 inches. The way I make this pocket is to turn down 1/2 inch at the top of the pocket and press. Then turn this down right sides together and sew a 1/2 inche seam on each side. Then turn this right side out, pushing out the corners well. Press. Then you can stitch a seam across the bottom of the hem you just made. Sew the seam from the bottom side of the fabric. It'll look like this.

Then pin the pocket onto the other lining piece and stitch around it like you did the first one and make your seams for the pockets. If you make it small for a cell phone, of course you'd only sew around the outside edge.

Finally you can start sewing the panels together.
Pin the lining pieces right sides together on the bottom seam. Stitch a 1/2 inch seam leaving about a 5 inch opening for turning the bag later. Press the seam open. If you press the bottom seam open before sewing the side seams it makes it easier to sew the bottom ends later. Then pin the side seams together and sew a 1/2 inch seam on them as well.

After you've sewn the bottom and side seams you'll see how to make the bottom square. Simply press each end together, matching seams and pin like this.

Then sew a 1/2 inch seam straight across. You can turn it to see what it looks like if you want, but you will need to turn it back so that the right sides are on the inside when sewing the outer and inner panels together.
Then you will do the same thing for the outer panels, except you won't leave an opening for turning. Sew the bottom seam first and press the seam open.

Turn the sewn together panels right side up and stitch a line on each side of the seam 1/4 inch away from the seam. I just put the edge of the presser foot on top of the seam and that gives me an accurate 1/4 inch distance. This reinforces the bag and makes the bottom look nice.

Then sew the outside seams. Make sure the side seams match if you added ribbon or used two fabrics on the front. Sew the ends of the bottom just like you did for the lining.

Turn the bag right side out. Isn't that cute?

In the next post in this series we'll make the handles and loop for the closure, sew the outside and inside panels together and hopefully finish this bag!
Friday, March 7, 2008
Week of Organization Recap
Hi everyone,
As of March 1st I am trying to be more organized. Being disorganized costs money, so this is a frugal post as well as an organization post!
I've done very well this week.
1. I made a list of things to do this week and have added to it every time I think of something, no matter how minor. If I don't write it down immediately, its gone forever! LOL
2. I checked my list several times a day to see what needed doing immediately or what I could be working on. For instance, one item is "work on taxes". Well I could do some work on that when I have a few minutes, such as adding up different deductions or just sorting out the different deductions.
3. I had our supper menu in my mind at least as early as the day before every day this week. I cooked supper in the morning on two days. I do better this way than to make a detailed menu out ahead of time. I do want to have the ingredients for several meals on hand at all times so I can put something together each day.
4. I checked my list of bills and drafts due to make sure they were on time and that there was money available for them.
5. I want to get back into the habit of shopping at CVS and Walgreens, but with a new perspective. I don't think I've set foot in CVS since Christmas. Can you believe that? Anyway, now I am only going to buy the things that we really use and need. I want to take advantage of any free after Extra Bucks and Rebate deals. My goal is, after an initial investment, to roll as many of the extra bucks and Rebates each week as I can. This means only buying items with Extra bucks that will generate more extra bucks. The same thing with the rebate from Walgreens. I have my rebate loaded onto my gift card each month. I'll use this gift card each month to buy more items that are free after rebate. I also plan to purchase other items from both of these stores that are on sale at a good price that we actually use.
I'm starting out slow, but this is what I bought today at lunch. I once had a huge supply of toothpaste that I got free or nearly free, but had either used it all up or given it all away. We needed toothpaste this week. At CVS I purchased two Colgate Advance toothpastes at $2.99 each which generated an extra bucks coupon of $5.98. There is a limit of 5 of these during the month of March, so next week I'll go back and buy two more using my $5.98 Extra bucks, as well as any other good deals I see in the sales paper this Sunday.
At Walgreens I bought 2 packages of Zest soap for $4.00 which generated a coupon for $4.00 on my next shopping order. I picked up the Easy Saver Catalog for March while there and next week I'll go back and buy some of the free after rebate items listed in there. I can use my $4.00 to go toward those purchases. I see that they also have Colgate Advance Toothpaste free after rebate. There are certain items that Walgreens has on sale at a good price from time to time and I'm going to be on the lookout for those in their sales paper too.
6. I placed the CVS and Walgreens coupons in a place that I wouldn't lose them! I've lost them before or forgot to redeem them before they expired!
7. I washed a load of laundry every day this week. I will only have about 3 loads to to tomorrow, compared to my usual 6 or 7.
8. I cleaned the bathrooms during the week and swished and swiped the potties regularly.
I think my organization this week has been pretty good!
As of March 1st I am trying to be more organized. Being disorganized costs money, so this is a frugal post as well as an organization post!
I've done very well this week.
1. I made a list of things to do this week and have added to it every time I think of something, no matter how minor. If I don't write it down immediately, its gone forever! LOL
2. I checked my list several times a day to see what needed doing immediately or what I could be working on. For instance, one item is "work on taxes". Well I could do some work on that when I have a few minutes, such as adding up different deductions or just sorting out the different deductions.
3. I had our supper menu in my mind at least as early as the day before every day this week. I cooked supper in the morning on two days. I do better this way than to make a detailed menu out ahead of time. I do want to have the ingredients for several meals on hand at all times so I can put something together each day.
4. I checked my list of bills and drafts due to make sure they were on time and that there was money available for them.
5. I want to get back into the habit of shopping at CVS and Walgreens, but with a new perspective. I don't think I've set foot in CVS since Christmas. Can you believe that? Anyway, now I am only going to buy the things that we really use and need. I want to take advantage of any free after Extra Bucks and Rebate deals. My goal is, after an initial investment, to roll as many of the extra bucks and Rebates each week as I can. This means only buying items with Extra bucks that will generate more extra bucks. The same thing with the rebate from Walgreens. I have my rebate loaded onto my gift card each month. I'll use this gift card each month to buy more items that are free after rebate. I also plan to purchase other items from both of these stores that are on sale at a good price that we actually use.
I'm starting out slow, but this is what I bought today at lunch. I once had a huge supply of toothpaste that I got free or nearly free, but had either used it all up or given it all away. We needed toothpaste this week. At CVS I purchased two Colgate Advance toothpastes at $2.99 each which generated an extra bucks coupon of $5.98. There is a limit of 5 of these during the month of March, so next week I'll go back and buy two more using my $5.98 Extra bucks, as well as any other good deals I see in the sales paper this Sunday.
At Walgreens I bought 2 packages of Zest soap for $4.00 which generated a coupon for $4.00 on my next shopping order. I picked up the Easy Saver Catalog for March while there and next week I'll go back and buy some of the free after rebate items listed in there. I can use my $4.00 to go toward those purchases. I see that they also have Colgate Advance Toothpaste free after rebate. There are certain items that Walgreens has on sale at a good price from time to time and I'm going to be on the lookout for those in their sales paper too.
6. I placed the CVS and Walgreens coupons in a place that I wouldn't lose them! I've lost them before or forgot to redeem them before they expired!
7. I washed a load of laundry every day this week. I will only have about 3 loads to to tomorrow, compared to my usual 6 or 7.
8. I cleaned the bathrooms during the week and swished and swiped the potties regularly.
I think my organization this week has been pretty good!
Great Laundry Detergent Stock Up
This is an update for my great Laundry Detergent Stock Up. I posted a picture of the great deal I got on 10 bottles of Purex Laundry Detergent in October, 2007. I estimated that the detergent would last 9 months. I tried to use only the amount needed based on the size and dirtiness of the clothes.
Well its almost 5 months later and I have two bottles left. I'm afraid I seriously over estimated how long the detergent would last!!! :o( However, I'll stretch these last two bottles as long as I can and see what I end up with.
I'll update you when the last bottle is gone!!!!
Anyway these are my tips for saving money when doing laundry:
1. Use less than the recommended amount of detergent based on the size of the load and the dirtiness.
2. Don't wash clean clothes. Sometimes in my house clothes get washed because "certain" people think that's easier than hanging them up! Now you know that's happened at your house too!!!
Here's a cute story. A friend of mine had a nice basement laundry room with a laundry chute. She placed a clean stack of clothes on her son's bed and asked him to put them away. She headed back into the basement and was met with the thud of a clean stack of clothes going back into the laundry chute!!! It was easier for him to do that than to go put them away!!!
I have been known to remove from the pile of dirty clothes and hang up certain items of clothes that just weren't dirty. The owner never knew the difference.
3. I've never made my own laundry detergent, but that's certainly a good option for those who want to do that. I do wait until laundry detergent is on sale and use a coupon.
4. Use 1/2 a dryer fabric softener sheet.
5. Hang up or hang out as many clothes as possible.
For more Frugal Friday tips go to Biblical Womanhood.
Well its almost 5 months later and I have two bottles left. I'm afraid I seriously over estimated how long the detergent would last!!! :o( However, I'll stretch these last two bottles as long as I can and see what I end up with.
I'll update you when the last bottle is gone!!!!
Anyway these are my tips for saving money when doing laundry:
1. Use less than the recommended amount of detergent based on the size of the load and the dirtiness.
2. Don't wash clean clothes. Sometimes in my house clothes get washed because "certain" people think that's easier than hanging them up! Now you know that's happened at your house too!!!
Here's a cute story. A friend of mine had a nice basement laundry room with a laundry chute. She placed a clean stack of clothes on her son's bed and asked him to put them away. She headed back into the basement and was met with the thud of a clean stack of clothes going back into the laundry chute!!! It was easier for him to do that than to go put them away!!!
I have been known to remove from the pile of dirty clothes and hang up certain items of clothes that just weren't dirty. The owner never knew the difference.
3. I've never made my own laundry detergent, but that's certainly a good option for those who want to do that. I do wait until laundry detergent is on sale and use a coupon.
4. Use 1/2 a dryer fabric softener sheet.
5. Hang up or hang out as many clothes as possible.
For more Frugal Friday tips go to Biblical Womanhood.
Poodles in Paris Handbag
SEW CRAFTY FRIDAY


I made this bag last Saturday. Its a delightful departure from the many John Deere bags I have been making! My blogger friend, Elizabeth, sent me this fabric with the request for a bag. She also sent me a box full of fabric from her stash.
The fabric has many pretty colors. I chose a matching chocolate brown for the accent color. Some of the ladies in the fabric have on skirts with brown and white dots, so I thought the brown and white dotted ribbon looked extra cute with it. The brown bottom and handle will stand up to a lot of wear because of the dark color and its a thick fabric.
Its so amazing how many different fabrics we have available to us!!! Our poor ancestors used feed sacks and what ever they could get, but now we have so much to choose from!
I'm also doing a pocketbook tutorial series on my blog. It'll be on my sidebar indefinitely if you want to make a bag.
Please visit the Waiting For Him Blog to see other sewing and craft projects.


I made this bag last Saturday. Its a delightful departure from the many John Deere bags I have been making! My blogger friend, Elizabeth, sent me this fabric with the request for a bag. She also sent me a box full of fabric from her stash.
The fabric has many pretty colors. I chose a matching chocolate brown for the accent color. Some of the ladies in the fabric have on skirts with brown and white dots, so I thought the brown and white dotted ribbon looked extra cute with it. The brown bottom and handle will stand up to a lot of wear because of the dark color and its a thick fabric.
Its so amazing how many different fabrics we have available to us!!! Our poor ancestors used feed sacks and what ever they could get, but now we have so much to choose from!
I'm also doing a pocketbook tutorial series on my blog. It'll be on my sidebar indefinitely if you want to make a bag.
Please visit the Waiting For Him Blog to see other sewing and craft projects.
Thursday, March 6, 2008
Pocketbook Tutorial, Part Three
All of the previous posts in this series are shown on the left sidebar under "pocketbook tutorial".
This picture shows me sewing around the edge of the quilt sandwich using a 1/4 inch seam. You might have to stretch the fabric a little and remove some of the pins as you go. I also increase the stitch length some.

When you get the edges all sewn, remove all the pins and trim the excess backing and quilt batting even with the panel top like this. You can save the quilt batting strips if you wish for use later in the handles.

Iron the panels with short up and down pressing movements.
You can leave the panels like this or you can dress them up a little bit. Sometimes I top stitch 1/4 inch on each side of the seam. This time I'm adding some grosgrain ribbon. Cut the ribbon a little longer than the width of the panel. Pin it on centering it on the seam line all the way across. Then edge stitch the ribbon on both edges like this.

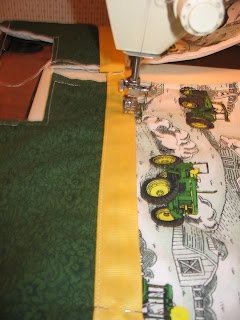
Trim off any extra ribbon on the edges of the panel.
Now its time to cut out the lining. Just lay the finished outside panel on top of your lining fabric and use it for the pattern. Cut two lining pieces the same size as the two outside panel pieces.
The inside pockets need to be sewn on the lining before any more sewing is done. I cut one piece of the green fabric on the fold, 16 inches wide by 7 inches deep. This gives you a double piece of fabric with the fold at the top on the 16 inch wide edge. I also cut a single layer of fabric from the tractor fabric which is 13 inches wide by 8 inches deep.
Its also a good time to cut out the handles. Cut two handles 4 inches wide by the width of the fabric on the fold.
These are pictures of the pockets, lining, handles and outside panels.


In the next post we'll sew the pockets on the lining, make the handles and start making this bag come together!
This picture shows me sewing around the edge of the quilt sandwich using a 1/4 inch seam. You might have to stretch the fabric a little and remove some of the pins as you go. I also increase the stitch length some.

When you get the edges all sewn, remove all the pins and trim the excess backing and quilt batting even with the panel top like this. You can save the quilt batting strips if you wish for use later in the handles.

Iron the panels with short up and down pressing movements.
You can leave the panels like this or you can dress them up a little bit. Sometimes I top stitch 1/4 inch on each side of the seam. This time I'm adding some grosgrain ribbon. Cut the ribbon a little longer than the width of the panel. Pin it on centering it on the seam line all the way across. Then edge stitch the ribbon on both edges like this.


Trim off any extra ribbon on the edges of the panel.
Now its time to cut out the lining. Just lay the finished outside panel on top of your lining fabric and use it for the pattern. Cut two lining pieces the same size as the two outside panel pieces.
The inside pockets need to be sewn on the lining before any more sewing is done. I cut one piece of the green fabric on the fold, 16 inches wide by 7 inches deep. This gives you a double piece of fabric with the fold at the top on the 16 inch wide edge. I also cut a single layer of fabric from the tractor fabric which is 13 inches wide by 8 inches deep.
Its also a good time to cut out the handles. Cut two handles 4 inches wide by the width of the fabric on the fold.
These are pictures of the pockets, lining, handles and outside panels.


In the next post we'll sew the pockets on the lining, make the handles and start making this bag come together!
Tuesday, March 4, 2008
Pocketbook Tutorial, Part Two
This is part two in this pocketbook tutorial series. All the posts for this series are under "Pocketbook Tutorial" underneath Labels on the sidebar.
I decided to make another John Deere Pocketbook in the smaller size. My husband is selling these to farmers for their wives and so this will be the 4th one I've made. I personally do not want to carry a John Deere pocketbook, but hey, whatever sells is great! I won't quilt this bag, but instructions for quilting the panels are shown here: Quilted Bag I would suggest making the quilt lines in a two inch grid if this is the first time you've machine quilted. The bags turn out really nice when they are quilted. The bag I carry now has a two inch quilted grid and I love it.
This pocketbook will have a tractor print for the outside with a dark green bottom. I also have a little green plaid fabric from a previous bag to possibly use for pockets or the hard insert that goes on the inside.
This is the fabric:

First press your outer fabric. You can use just one fabric if you like. If you are just using one fabric, cut two of your outer fabrics from the pattern in Part One.
If you want to use two different fabrics, you will notice on the picture of the pattern in Part One that there is a line at the bottom called the design line. I cut the bottom part in the dark green and the top part in the tractor print. I just added 1/2 inch seam allowance to each piece so that the finished panels would be the same size as the pattern. The pattern says to cut the panels so that the side seams are parallel with the lengthwise grain of the fabric if it isn't going to be quilted. I'm not quilting this bag, so will follow the directions.
Cut two of each, one for the front panel and one for the back panel, like this:

The finished sizes (if you don't want to make a pattern) are 10 inches by 15 inches for the top piece and 5 1/2 by 15 for the bottom part. The two squares that are cut on on the bottom part are 2 1/2 inches square.
Just make sure that any directional designs are going the right way. My tractors need to be right side up!
Pin the top and bottom pieces right sides together like this:

Make a 1/2 inch seam, press open the seams and the two panels will look like this:

Then you will need to cut two pieces of quilt batting and two pieces of plain fabric for the backing a little bigger all the way around than the panels. I just use any fabric I have on hand for the backing fabric or you can buy some inexpensive fabric if you don't have any. If you wanted to quilt a grid on the panels, now's the time to draw your lines like in the link above.
Make two quilt sandwiches with the front panel face up on top, the quilt batting beneath that and the plain fabric on the back. The bottom fabric will not be visible when the bag is finished, so don't worry about what it looks like. Smooth out the top fabric well and pin it all together really well like this:

Be sure to position the pins so that you can sew over them around the edges. In the next post in this series, we'll sew the quilt sandwich around the edges, trim off the excess fabric, and cut out the lining, handles and pockets.
I decided to make another John Deere Pocketbook in the smaller size. My husband is selling these to farmers for their wives and so this will be the 4th one I've made. I personally do not want to carry a John Deere pocketbook, but hey, whatever sells is great! I won't quilt this bag, but instructions for quilting the panels are shown here: Quilted Bag I would suggest making the quilt lines in a two inch grid if this is the first time you've machine quilted. The bags turn out really nice when they are quilted. The bag I carry now has a two inch quilted grid and I love it.
This pocketbook will have a tractor print for the outside with a dark green bottom. I also have a little green plaid fabric from a previous bag to possibly use for pockets or the hard insert that goes on the inside.
This is the fabric:

First press your outer fabric. You can use just one fabric if you like. If you are just using one fabric, cut two of your outer fabrics from the pattern in Part One.
If you want to use two different fabrics, you will notice on the picture of the pattern in Part One that there is a line at the bottom called the design line. I cut the bottom part in the dark green and the top part in the tractor print. I just added 1/2 inch seam allowance to each piece so that the finished panels would be the same size as the pattern. The pattern says to cut the panels so that the side seams are parallel with the lengthwise grain of the fabric if it isn't going to be quilted. I'm not quilting this bag, so will follow the directions.
Cut two of each, one for the front panel and one for the back panel, like this:

The finished sizes (if you don't want to make a pattern) are 10 inches by 15 inches for the top piece and 5 1/2 by 15 for the bottom part. The two squares that are cut on on the bottom part are 2 1/2 inches square.
Just make sure that any directional designs are going the right way. My tractors need to be right side up!
Pin the top and bottom pieces right sides together like this:

Make a 1/2 inch seam, press open the seams and the two panels will look like this:

Then you will need to cut two pieces of quilt batting and two pieces of plain fabric for the backing a little bigger all the way around than the panels. I just use any fabric I have on hand for the backing fabric or you can buy some inexpensive fabric if you don't have any. If you wanted to quilt a grid on the panels, now's the time to draw your lines like in the link above.
Make two quilt sandwiches with the front panel face up on top, the quilt batting beneath that and the plain fabric on the back. The bottom fabric will not be visible when the bag is finished, so don't worry about what it looks like. Smooth out the top fabric well and pin it all together really well like this:

Be sure to position the pins so that you can sew over them around the edges. In the next post in this series, we'll sew the quilt sandwich around the edges, trim off the excess fabric, and cut out the lining, handles and pockets.
Cooking With Love
Sometimes cooking can be drudgery, especially when I don't plan well. I can get caught up in the hustle and bustle of my days and forget what its all about. Last week I was very unprepared and although we had plenty to eat, there wasn't much joy in the process!
I am being more prepared and organized this week, Praise the Lord!
This morning before work I made lasagna for tonight's meal. When I get home I'll make salad and bake some crescent rolls or garlic toast.
As I was busily trying to get the lasagna together at 6:00 A.M. this morning I thought about how much my guys like lasagna, salad and bread and how nice it would be to have it almost on the table by the time I got home. I could just feel my love for all 3 of them going into that lasagna!
So my Kitchen Tip for today is to cook with love. These are some ideas:
1. Of course, plan ahead.
2. When you are cooking think of it as an act of service to those you love. You are cooking for them as if you were cooking for the Lord.
3. Try to cook nutritious meals that will benefit their health and well being.
4. Try to cook at least one thing at every meal that each person likes.
5. The presentation of the food can make it more special. On a week night, try candles, cloth napkins, and your best dishes.
6. Our boys like to eat AT ALL HOURS OF THE NIGHT, either because they just like to or because their work/school schedules dictate when they eat. We almost always have food available they can just microwave. My hubby makes plates for them and puts their names on it so when they come home and open the fridge, they have their own personalized food. How special is that!!!? I think they will look back on this season of their life and remember how they always had food they liked.
7. I make my son's lunch that he takes to work. I don't have to do this. After all he is almost 21 years old. But I WANT to do it. It helps him a lot and I can show him my love that way. I always put in foods he likes. He really appreciates this extra effort by me and always thanks me.
I think that if we think of cooking as an expression of our love and as a service to our loved ones, it won't be such drudgery after all!
For more Kitchen Tips, visit Tammy's Recipes!
I am being more prepared and organized this week, Praise the Lord!
This morning before work I made lasagna for tonight's meal. When I get home I'll make salad and bake some crescent rolls or garlic toast.
As I was busily trying to get the lasagna together at 6:00 A.M. this morning I thought about how much my guys like lasagna, salad and bread and how nice it would be to have it almost on the table by the time I got home. I could just feel my love for all 3 of them going into that lasagna!
So my Kitchen Tip for today is to cook with love. These are some ideas:
1. Of course, plan ahead.
2. When you are cooking think of it as an act of service to those you love. You are cooking for them as if you were cooking for the Lord.
3. Try to cook nutritious meals that will benefit their health and well being.
4. Try to cook at least one thing at every meal that each person likes.
5. The presentation of the food can make it more special. On a week night, try candles, cloth napkins, and your best dishes.
6. Our boys like to eat AT ALL HOURS OF THE NIGHT, either because they just like to or because their work/school schedules dictate when they eat. We almost always have food available they can just microwave. My hubby makes plates for them and puts their names on it so when they come home and open the fridge, they have their own personalized food. How special is that!!!? I think they will look back on this season of their life and remember how they always had food they liked.
7. I make my son's lunch that he takes to work. I don't have to do this. After all he is almost 21 years old. But I WANT to do it. It helps him a lot and I can show him my love that way. I always put in foods he likes. He really appreciates this extra effort by me and always thanks me.
I think that if we think of cooking as an expression of our love and as a service to our loved ones, it won't be such drudgery after all!
For more Kitchen Tips, visit Tammy's Recipes!
Monday, March 3, 2008
Pocketbook Tutorial
The Pink John Deere pocketbook that was donated to a little country church's fundraiser auction sold for $40.00. I was pleased with that. I just didn't want it to sell cheaper than what I could have sold it for. I would rather sell the bag and donate the money to the church if that was going to happen. Here is a picture of the bag if you missed it.
I have been thinking about doing a pocketbook tutorial series. I wasn't sure if anyone would be interested, but I have had some interest by email, so I have decided to do it!
This will be helpful to me as well. Once I do the tutorial, I'll have all the directions written down for my future use.
My disclaimer is that I'm not an expert seamstress by any means! These instructions will show how I make the bags based on the directions that came with the pattern, as well as my own ideas. I'm sure a more experienced hand bag seamstress could give me some pointers on how to do things easier and better and I welcome any suggestions.
I'm going to make a bag from the beginning and do several posts describing what I'm doing as I cut and/or sew.
So here is the first post:
I have been making the bag in two basic sizes. A medium sized bag and one a little smaller. I also made 2 children's bags. Its easy to change the pattern to fit the size you want. This is a picture of the pattern for the larger bag that I make. It measures 18 inches wide and 14 1/2 inches tall. The squares cut out on each side of the bottom are 2 1/2 inches square.

My pattern is getting a little tattered and I need to make myself a new one. I think I might just start cutting out the bags on my rotary cutting board. I have the measurements and the finished cut pieces would be more accurate. To make your own pattern just cut the pattern in the measurements given. Then cut out the squares at the bottom. That's all there is to the pattern.
To make the smaller bag I just folded the pattern in the middle like this. Its exactly the same size as the larger bag except its 15 inches wide.

The bag can be made all one color or you can use a different color for the bottom. I have made the bottom part one color and a top 2 or 3 inch wide section another color. The bags can be quilted or not quilted. You can embellish the bag with ribbon, fringe, leave them plain or whatever you wish. I like to look at other people's handmade bags on Ebay to get ideas. The different designs you can come up with are endless.
You will need 1 yard of your outside fabric and 1 yard of your lining fabric. This is really too much, but any extra can be used to make pockets and if you wish, accessories.
I use quilt batting in my bags whether or not they are quilted. This gives the bag some body and the handles a little padding. At first I was able to use leftover quilt batting I had on hand, but I soon ran out of that. I like to buy crib size quilt batting because the size is easier to handle.
I'll be posting more in this series as I work on my next pocketbook.
I have been thinking about doing a pocketbook tutorial series. I wasn't sure if anyone would be interested, but I have had some interest by email, so I have decided to do it!
This will be helpful to me as well. Once I do the tutorial, I'll have all the directions written down for my future use.
My disclaimer is that I'm not an expert seamstress by any means! These instructions will show how I make the bags based on the directions that came with the pattern, as well as my own ideas. I'm sure a more experienced hand bag seamstress could give me some pointers on how to do things easier and better and I welcome any suggestions.
I'm going to make a bag from the beginning and do several posts describing what I'm doing as I cut and/or sew.
So here is the first post:
I have been making the bag in two basic sizes. A medium sized bag and one a little smaller. I also made 2 children's bags. Its easy to change the pattern to fit the size you want. This is a picture of the pattern for the larger bag that I make. It measures 18 inches wide and 14 1/2 inches tall. The squares cut out on each side of the bottom are 2 1/2 inches square.

My pattern is getting a little tattered and I need to make myself a new one. I think I might just start cutting out the bags on my rotary cutting board. I have the measurements and the finished cut pieces would be more accurate. To make your own pattern just cut the pattern in the measurements given. Then cut out the squares at the bottom. That's all there is to the pattern.
To make the smaller bag I just folded the pattern in the middle like this. Its exactly the same size as the larger bag except its 15 inches wide.

The bag can be made all one color or you can use a different color for the bottom. I have made the bottom part one color and a top 2 or 3 inch wide section another color. The bags can be quilted or not quilted. You can embellish the bag with ribbon, fringe, leave them plain or whatever you wish. I like to look at other people's handmade bags on Ebay to get ideas. The different designs you can come up with are endless.
You will need 1 yard of your outside fabric and 1 yard of your lining fabric. This is really too much, but any extra can be used to make pockets and if you wish, accessories.
I use quilt batting in my bags whether or not they are quilted. This gives the bag some body and the handles a little padding. At first I was able to use leftover quilt batting I had on hand, but I soon ran out of that. I like to buy crib size quilt batting because the size is easier to handle.
I'll be posting more in this series as I work on my next pocketbook.
A Monday Minute
My organization progress for today:
1. Made a to do list for the week, including due dates for bills, etc.
2. Paid one bill that was due.
3. Checked my little planner for any appointments or things needed to be done.
4. Cleaned one bathroom before leaving home. I want to complete one item on my basic cleaning list each day so Saturdays can be reserved for sewing!
5. I know what's for supper!
6. Have made a mental note to thaw frozen chicken breasts for tomorrow night's supper. I need to write that down! Note: I just stopped typing and wrote it down!
7. Need to go on line to library's website to check when books are due. Note: I just stopped typing and wrote it down.
8. When I get home I'll do one load of laundry, start to finish.
9. I haven't written down an exact menu plan for the week, but have several options in mind and the ingredients to make them. I want to plan each night's supper the night before. If I write down what we eat on a calendar each day for 2 weeks, I'll already have a plan for the following two weeks.
10. Made notes for ideas to blog about as they come to mind.
11. I plan to look at my to do list at least every morning and every night, if not more often. It doesn't do any good to write it down if I don't look at it!
1. Made a to do list for the week, including due dates for bills, etc.
2. Paid one bill that was due.
3. Checked my little planner for any appointments or things needed to be done.
4. Cleaned one bathroom before leaving home. I want to complete one item on my basic cleaning list each day so Saturdays can be reserved for sewing!
5. I know what's for supper!
6. Have made a mental note to thaw frozen chicken breasts for tomorrow night's supper. I need to write that down! Note: I just stopped typing and wrote it down!
7. Need to go on line to library's website to check when books are due. Note: I just stopped typing and wrote it down.
8. When I get home I'll do one load of laundry, start to finish.
9. I haven't written down an exact menu plan for the week, but have several options in mind and the ingredients to make them. I want to plan each night's supper the night before. If I write down what we eat on a calendar each day for 2 weeks, I'll already have a plan for the following two weeks.
10. Made notes for ideas to blog about as they come to mind.
11. I plan to look at my to do list at least every morning and every night, if not more often. It doesn't do any good to write it down if I don't look at it!
Sunday, March 2, 2008
Weekend Update
Good Morning! Its nearly 6:00 A.M. on the first Sunday of March. March came in like a lamb, so look out on March 31st!
My plans for today are to attend Church, cook a family dinner, spend time with family and do some planning for the week. I'd also like to sew a little. :o)
During this week I realized that I am very disorganized. Examples:
1. On February 29th I found my reminder card to have my driver's license renewed by February 22nd! AARGH In my office this is known as NOL (No Operator's License) LOL. AND my nephew is a Sheriff's Deputy who is known to check driver's licenses at the end of the road I live on because its a blind intersection and people can't turn off and run until its too late! Anyway I went after work on Friday to get this done which is the worst time to do so. There were so many people at DMV I couldn't even find a seat! The good news is I passed the vision and sign test and got the *&%^$ thing.
2. I only owed $34.00 on a credit card, but forgot to pay it on time and I'm sure they'll charge me $40.00 late fee. This makes me want to cry!!!
3. I forgot to make sure there was enough money in a bank account that has a draft coming out on the 27th. The bank transferred money to cover it, but charged me $10.00to do so.
4. My meal planning last week was pitiful, but we didn't starve!
I am determined to get back into the habit of being organized. I am going to write down the things I might forget in my organizer and CHECK this daily!
This afternoon I plan to make some foods for the week ahead.
I'm also going to start keeping up with the CVS and Walgreens deals again. But, I only plan to take advantage of the very best deals on the things we use the most. I love being stocked up on toothpaste, toilet paper, shampoo, deodorant, soap, laundry detergent, etc.
Friday was a crazy leap day for me! Not only was it extremely busy at work and I had to get my driver's license renewed, but I also took Dave, our 15 year old dog, to the veterinarian to get him checked out. He has been having accidents in the house, among other things. The diagnosis: He is old and senile. There is medication for senile dogs that might help. But, for the time being the Veterinarian suggested giving him Flintstones vitamins. I would never have thought about doing this. I'm supposed to put 1/2 a Flintstones Complete Vitamin in his canned food a few minutes before he eats it so it can dissolve. This regimen is supposed to make him feel better. He moves around really slow and sometimes I have to carry him up and down the steps. After one vitamin I thought he was more energetic, but maybe this is just my imagination. Maybe I should take some of those Flintstones vitamins!!!
Saturday was a nice day. It wasn't too cold, but was windy. I wanted to hang out our sheets, but the wind was whipping the sheets so bad I couldn't get them on the line. I just took them back inside and dried them in the dryer.
I went to my favorite thrift store and one yard sale and bought nothing. I didn't get to the yard sale early and they were down to the leftovers. The thrift store had the same things they had the last time I was there.
I spent the afternoon sewing and finished a pocketbook that I like very much! I'll post a picture later this week.
Well, I'm off to read the Sunday Bible readings for today and start dinner.
Have a great Sunday!
My plans for today are to attend Church, cook a family dinner, spend time with family and do some planning for the week. I'd also like to sew a little. :o)
During this week I realized that I am very disorganized. Examples:
1. On February 29th I found my reminder card to have my driver's license renewed by February 22nd! AARGH In my office this is known as NOL (No Operator's License) LOL. AND my nephew is a Sheriff's Deputy who is known to check driver's licenses at the end of the road I live on because its a blind intersection and people can't turn off and run until its too late! Anyway I went after work on Friday to get this done which is the worst time to do so. There were so many people at DMV I couldn't even find a seat! The good news is I passed the vision and sign test and got the *&%^$ thing.
2. I only owed $34.00 on a credit card, but forgot to pay it on time and I'm sure they'll charge me $40.00 late fee. This makes me want to cry!!!
3. I forgot to make sure there was enough money in a bank account that has a draft coming out on the 27th. The bank transferred money to cover it, but charged me $10.00to do so.
4. My meal planning last week was pitiful, but we didn't starve!
I am determined to get back into the habit of being organized. I am going to write down the things I might forget in my organizer and CHECK this daily!
This afternoon I plan to make some foods for the week ahead.
I'm also going to start keeping up with the CVS and Walgreens deals again. But, I only plan to take advantage of the very best deals on the things we use the most. I love being stocked up on toothpaste, toilet paper, shampoo, deodorant, soap, laundry detergent, etc.
Friday was a crazy leap day for me! Not only was it extremely busy at work and I had to get my driver's license renewed, but I also took Dave, our 15 year old dog, to the veterinarian to get him checked out. He has been having accidents in the house, among other things. The diagnosis: He is old and senile. There is medication for senile dogs that might help. But, for the time being the Veterinarian suggested giving him Flintstones vitamins. I would never have thought about doing this. I'm supposed to put 1/2 a Flintstones Complete Vitamin in his canned food a few minutes before he eats it so it can dissolve. This regimen is supposed to make him feel better. He moves around really slow and sometimes I have to carry him up and down the steps. After one vitamin I thought he was more energetic, but maybe this is just my imagination. Maybe I should take some of those Flintstones vitamins!!!
Saturday was a nice day. It wasn't too cold, but was windy. I wanted to hang out our sheets, but the wind was whipping the sheets so bad I couldn't get them on the line. I just took them back inside and dried them in the dryer.
I went to my favorite thrift store and one yard sale and bought nothing. I didn't get to the yard sale early and they were down to the leftovers. The thrift store had the same things they had the last time I was there.
I spent the afternoon sewing and finished a pocketbook that I like very much! I'll post a picture later this week.
Well, I'm off to read the Sunday Bible readings for today and start dinner.
Have a great Sunday!
Subscribe to:
Posts (Atom)
Glimpses of Home - first quarter of 2021
I made a list of my 2021 goals that I wrote down in the back of my planner. Its time to review that to see how I am doing! But, here are a ...

-
 Note: If you want to buy clothespin bags, please visit MY ETSY SHOP (CLICK HERE) But, feel free to make your own from this tutorial! T...
 -
 Its time for a give away! I previously listed these two hand made items in my Etsy Shop, but the listings expired before they were sold. The...